Posted on
In 2015, I moved this site to Github Pages from a Drupal 7 installation. I had several reasons for this move, but my biggest concern was security. I was—and still am—a busy professional with clients that need me to keep my attention on their sites when significant security announcements or releases land in the Drupal world. When I made the move, I was much more concerned with keeping Drupal.org secure and stable than a personal blog.
I was also keen to use markdown for editing my blog—which I've since become less enamored with due to the excellent markdown autocompletion support built into tools like Google Docs and even Drupal's CKEditor implementation.
After years of setting up ambitious editorial experiences in modern Drupal, I wanted to be able to experience those improvements in my own blogging. Heck, maybe it will get me writing a bit more.
So with a little spare time this holiday season, I've decided to give a new approach a try.
This site was built using Drupal CMS (currently 1.0.0-rc2), DDev, Tome (a static site generator for Drupal), and Github Pages using a Github Action to deploy the Tome-generated artifact. Technically, the site is also delivered via Cloudflare using a free-tier account. The Cloudflare setup was a throwback to the days when Github Pages did not support HTTPS. I've kept it for the analytics the Cloudflare dashboard. With this current setup, I spend $0 on hosting—though there are a few drawbacks that I'll explain below.
Getting Started with DDev
A few days ago, drubb posted instructions for trying Drupal CMS using Lando. While I used Lando for quite a few years on the Portland.gov project, and I'm quite fond of its approach to tooling, I pretty much exclusively use DDev these days for local development. It is faster and has options for Docker management like Rancher Desktop. It's fast on Mac ARM processors and it just works—it also feels like the community is standardizing on DDev a bit as a "recommended" local development tool. So I thought, huh, I wonder if I can match that Lando example.
30 minutes later, because of a couple of wrong turns, I had a working copy of Drupal CMS.
Here are the steps assuming you already have DDev installed.
Create your project directory and open it.
mkdir drupalcms && cd drupalcmsConfigure DDev. Feel free to update your project name and webroot.
ddev config --auto --project-name=drupalcms --docroot=web --project-type=drupalUse DDev to create your composer project within your project directory. Installing Composer is not required as it will use Composer in the container.
ddev composer create drupal/cms --ignore-platform-reqs --stability devLaunch your site and use the site installer. You won't need to enter database credentials as DDev takes care of this for you.
ddev launchAssuming you didn't change the project name, it will open the resulting site at https://drupalcms.ddev.site/ and you'll see the new Drupal CMS installer.
It's worth noting that phenaproxima, who is a big part of architecting how Drupal CMS is composed, suggested that there are no guarantees that the above will continue to work through the first stable release even if that is the goal.
Drupal CMS (Starshot) as a Starting Point
I plan to do a more detailed write up on my thoughts regarding Starshot. I've followed it pretty closely since DrupalCon Portland when it was announced. It has a lot of promise to give a more complete Drupal experience from the point of installation. It is also very opionnated. I'm pretty opinionated as well, at least about my Drupal approaches, so I'm on the fence regarding some of the choices in Drupal CMS, but I wanted this initial release of my blog to be as close to the based installation as possible.
Keep in mind, all of what I'm showing below is subject to change between now and 15 January 2025 when Drupal CMS is scheduled for its first stable release. That said, with less than a month, I wouldn't expect huge changes from what I'm seeing at this point. They might remove a bit more, but I doubt a lot will get added.
To get started, I selected just the "blog" content type, clicked next.
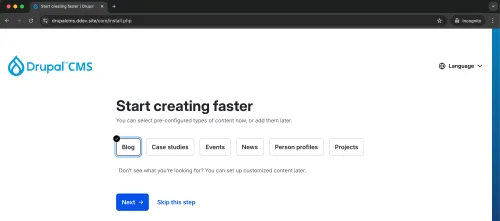
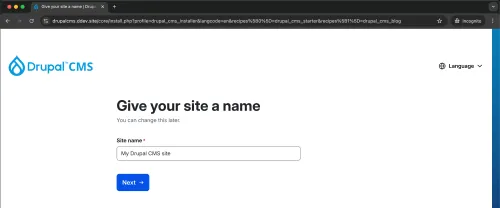
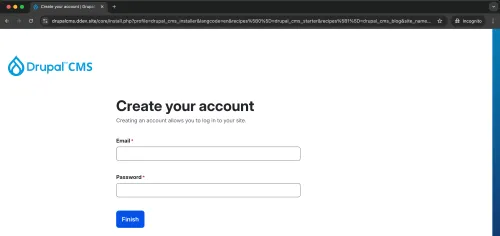
The next few screens will walk you through naming your site and creating the first user.
Incidentally, it automatically names this first user "admin" (opinionated remember) so you may want to consider this initial account a service account rather than the account you'll regularly use to publish content on a site like a personal blog.
The first thing I noticed was just how many modules Drupal CMS has in its default install—even when all I've added is the blog content type—so very opinionated at this point.
Now that the install is complete, your fresh new user will land on a fresh new dashboard.
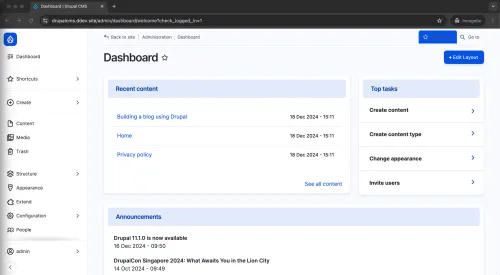
The combination of the Gin admin theme, the new navigation layout, and this simple dashboard is a significant change for anyone with much of a history with Drupal.
Clicking "Create" in the new side navigation will immediately give you a little sense of just how much is included by default in with just the blog content type enabled.
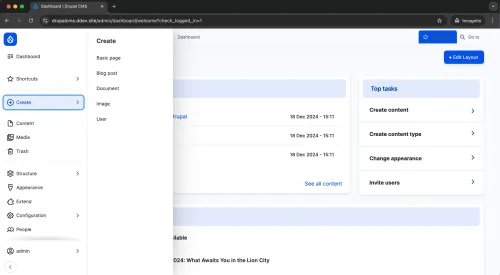
The options for basic page, blog post (enabled as part of the install) as well as document, image, and user all make sense as sane defaults. That said, I was shocked at some of hte enabled modules in this initial install. In addition to core modules, the following is in this the standard profile:
- Autosave Form
- ECA
- BPMN.iO for ECA
- ECA base
- ECA BPMN
- ECA Content
- ECA Core
- ECA Form
- ECA Miscellaneous
- ECA Render
- ECA UI
- ECA User
- Simple Add More
- JQuery UI
- JQuery UI Resizeable
- Drupal Symphony Mailer Lite
- Easy Email
- Easy Email Overrides
- Focal Point
- SVG Image
- Easy Breadcrumb
- Automatic Updates (which will be part of core one day)
- Automatic Updates Extensions
- Coffee (though I hear this might be removed for performance reasons)
- Gin Toolbar
- Login with email or username
- Menu Link Attributes
- Package Manager
- Pathauto
- Project Browser
- Redirect
- Redirect 404
- Token
- Trash
- Antibot
- CAPTCHA
- Friendly Captcha
- Honeypot
- Klaro Cookie & Consent Manager
- Linkit
- Add Content by Bundle
- Better Exposed Filters
- Selective Better Exposed Filters
Wow. Did I mention Drupal CMS will be a bit opinionated? This isn't even a complete list of what has been added to the composer dependencies for the project. There are quite a few additional modules included in that dependency tree that you'll likely find yourself using on many projects.
While I've used a fair number of these modules, I was surprised with quite a few that I had not hear of before Drupal CMS. When I get around to a more thorough review, I'll give my thoughts on which of these I feel like I'll be pruning from nearly every install.
It's also worth noting that there is so much more in Drupal CMS than just contrib modules and related recipes. For example, Drupal CMS has 53 image styles and 29 responsive image styles. Drupal CMS also enables some features by default that I have not used on every Drupal project like Layout Builder—which I've never used without installing a lot of other layout builder contrib modules. This choice has huge implications for future Drupal architectural approaches.
Importing Old Posts into Drupal CMS
Drupal has powerful migration tools to get content into its database. If you haven't seen the demo from DrupalCon Barcelona where Dries talks about the possibilty of AI importers, I highly recommend it. That said, I wasn't keen on writing all the prompts to pull in 59 blog posts. (Did I mention I want to write more?)
Jekyll has a templating language, Liquid, that is quite similar to the Twig used by Drupal. I spent a little time to create a template that would generate a CSV file with my posts and used the Feeds module to create an import process in a couple hours.
Alternatively, I could have used the migration framework and written a script to use a contrib module like Migrate Source CSV. I highly recommend the migration framework for complex migrations that need to be rerun multiple times against large content models.
Configuring Tome and Github Pages
Tome is a static site generator for Drupal. The documentation for Tome is pretty solid with guides for several different hosting options.
Adding Tome is simple:
composer require drupal/tome
drush en tome
You'll need to let Drupal know where Tome should place its artifacts by adding some values to settings.php. The defaults in Tome's documentation look like this:
$settings['tome_files_directory'] = '../files';
$settings['tome_content_directory'] = '../content';
$settings['tome_static_directory'] = '../html';
$config_directories['sync'] = '../config';
I chose to put my files in the same directory as the generated static content.
$settings['tome_files_directory'] = '../html';This allowed me to keep some images from my Jekyll installation in the same site relative location as it copied them from what was the Jekyll root into the new Tome static directory.
Running your first export is straightforward.
drush tome:export -yJust before you commit your changes, you'll want to generate your static site with the production URI. For my site, I ran this.
drush tome:static --uri=https://joshuami.comI now have a completely static site in the html directory of my repo.
To get those files deployed, I made some small changes in my approach to hosting on Github Pages. In the official Tome approach to hosting on Github, these is an example shell script that can be run via a composer script that will replace your root repo with the static asset generated by Tome.
Personally, I wanted my repo to have a copy of my Drupal code rather than just the artifacts. Github Pages has an option to use Github Actions to deploy the artifacts from any artifact directory, this was perfect for my needs.
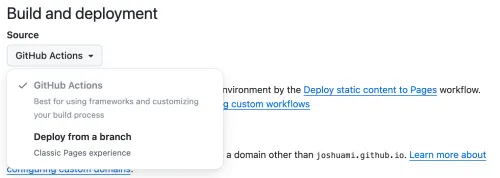
You'll be prompted to create an workflow from a standard static site templatet that lives at .github/workflows/static.yml within your repo.
My static.yml looks like this.
# Simple workflow for deploying static content to GitHub Pages
name: Deploy static content to Pages
on:
  # Runs on pushes targeting the default branch
  push:
    branches: ["main"]
  # Allows you to run this workflow manually from the Actions tab
  workflow_dispatch:
# Sets permissions of the GITHUB_TOKEN to allow deployment to GitHub Pages
permissions:
  contents: read
  pages: write
  id-token: write
# Allow only one concurrent deployment, skipping runs queued between the run in-progress and latest queued.
# However, do NOT cancel in-progress runs as we want to allow these production deployments to complete.
concurrency:
  group: "pages"
  cancel-in-progress: false
jobs:
  # Single deploy job since we're just deploying
  deploy:
    environment:
      name: github-pages
      url: ${{ steps.deployment.outputs.page_url }}
    runs-on: ubuntu-latest
    steps:
      - name: Checkout
        uses: actions/checkout@v4
      - name: Setup Pages
        uses: actions/configure-pages@v5
      - name: Upload artifact
        uses: actions/upload-pages-artifact@v3
        with:
          # Upload entire repository
          path: 'html'
      - name: Deploy to GitHub Pages
        id: deployment
        uses: actions/deploy-pages@v4
The only bit I had to change in their example file was to change the path from . to html where my artifact is located.
After committing the workflow definition, the resulting build replaced my static Jekyll generated site with my new Tome generated site.
A Couple of Gotchas and Changes
Compared to authoring markdown for Jekyll, the Drupal editor experience is so much more satisfying.
I did experience a couple of gotchas in my first attempt at publication.
- Drupal CMS includes a user account menu block that displays a login link to anonymous users. The login form is useless in a static site and returned a page not found—just needed to remove the block.
- Drupal CMS installs Klaro for cookie management which I disabled to avoid static asset errors.
- The view created for my blog archive had AJAX enabled by default. That needed to be turned off to properly render the paginated results as static HTML.
I also added a little to my default installation in addition to Tome.
- I realized that I forgot to change to authored by user to a new "joshuami" account rather than "admin", so I installed Views Bulk Edit and updated all the posts in one edit.
- I wanted to add license information to the footer, so I installed Block Content (from core) and placed a content block in the footer.
- As mostly a technology blog, I wanted to format my code snippets a bit so I added Highlight.js Input Filter.
- From Drupal CMS, I installed both the SEO Tools and Accessibility Tools recipes from the project browser.
- I didn't want the "Learn more" link on every blog post for accessibility reasons, so I removed that field from the teaser display.
- I noticed that the teasers were kinda blah, so I enabled a Card display mode and used the
drupal_cms_oliverotemplate fornode--card.html.twig, which is now included in the latest release of Drupal CMS.
So far, those are my only additions, but there will be more to come.
Some Drawbacks
With any technology choice there will be some tradeoffs.
I was surprised to see that my new site does not score as well on Lighthouse.
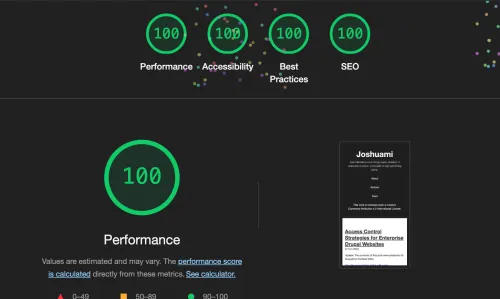
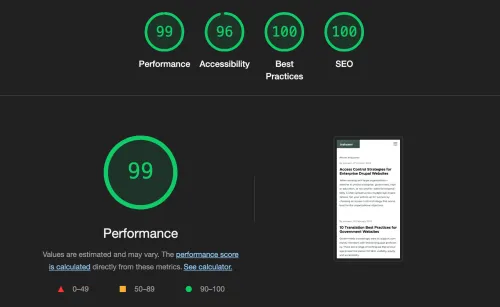
I have not yet had a chance to debug the render blocking CSS and unused javascript that reduces the performance score. I was surprised to see that the Olivero theme would result in less than perfect accessibility. It is specifically dinged for links that rely on color to be distinguishable—they need some underlines on hover or other decoration to meet the goal.
While I appreciate all the amazing work to get Olivero into Drupal core, it is not my favorite theme—even for a simple blog. I'll be figuring out my theming approach in a follow up. I've considered trying TailwindCSS or similar for the experience.
I'm also thinking that I may need a more traditional host to store backups of the database. While a static site is great for security, it is a trade off for disaster recovery when the content is stored in an ephemeral container in my local development environment. This wasn't a concern with Jekyll as the data was all stored in markdown and committed to git. I'll have to give that a bit more thought before I generate to many more posts.